Introduction
This is the second tutorial in our series on testing React and Redux applications. If you haven’t read the first part, we encourage you to do so.
Redux is a library for managing state in React applications. Since the code using Redux is composed of many small pieces, it’s very easy to test it. In the previous tutorial, we scaffolded the base for our application and set up AVA. In this tutorial, we will start building our todo application by defining and testing common Redux patterns, learn about basic Redux concepts, and write tests for them.
Prerequisites
For this tutorial, you will need to:
- have basic knowledge of Redux, and
- have Redux installed:
npm install --save redux
Actions
Redux doesn’t enforce strict conventions, so it doesn’t matter what our action looks like as long as it has a type and, optionally, a payload. In larger projects, it’s very important to keep actions consistent by using something like redux-actions. However, in this tutorial we’re going to keep things simple. Let’s create and export our first action creator in src/actions.js:
// src/actions.js
export const TOGGLE_TODO = 'TOGGLE_TODO';

export const toggleTodo = id => ({
  type: TOGGLE_TODO,
  payload: id,
});
When dispatched, this action will cause a todo item of a given id to switch its state, for instance from completed to not completed.
Let’s test this action in src/actions.test.js:
// src/actions.test.js
import test from 'ava';
import { toggleTodo, TOGGLE_TODO } from './actions';

test('toggleTodo action', t => {
  t.deepEqual(toggleTodo(5), {
    type: TOGGLE_TODO,
    payload: 5
  });
});
We can now run npm test to ensure that the test passes.
Reducers
Reducers react to dispatched actions by modifying the store. Let’s create a reducer which reacts to the TOGGLE_TODO action:
// src/reducers.js
import { combineReducers } from 'redux';
import { TOGGLE_TODO } from './actions';

export const todos = (state = [], action) => {
  switch (action.type) {
    case TOGGLE_TODO:
      return state.map(t => {
        if (t.id === action.payload) {
          return { ...t, completed: !t.completed };
        }
        return t;
      })
    default:
      return state;
  }
};

export default combineReducers({ todos });
We are exporting individual reducers for testing, and the root reducer for the application.
Let’s test this reducer in src/reducers.test.js:
// src/reducers.test.js
import test from 'ava';
import { todos } from './reducers';
import { toggleTodo } from './actions';

test('todos reducer', t => {
  t.deepEqual(todos([
    { id: 0, completed: false, text: 'buy milk' },
    { id: 1, completed: false, text: 'walk the dog' },
    { id: 2, completed: false, text: 'study' }
  ], toggleTodo(1)), [
    { id: 0, completed: false, text: 'buy milk' },
    { id: 1, completed: true, text: 'walk the dog' },
    { id: 2, completed: false, text: 'study' }
  ]);
});
Here, we’re passing an initial set of todos to the reducer, none of which are completed. As the second argument, we are passing the action which toggles the state of the todo with the given id. We’ll run npm test to see if our test passes.
Selectors
Selectors are not as common as actions and reducers, but they are a very convenient way of fetching resources out of the Redux store. They make refactoring easier, we can memorize them with libraries like reselect, and, most importantly, we can test them.
A selector looks as follows:
// src/selectors.js
export const getTodos = state => state.todos;
Selectors can be composed, for example a getFirstTodo selector would use getTodos to retrieve the list of todos.
It’s a good idea to test at least the higher-level selectors to ensure that low-level selectors work as well. For example, passing tests for getFirstTodo would guarantee that getTodos works as well.
Let’s test getTodos:
// src/selectors.test.js
import test from 'ava';
import { getTodos } from './selectors';

test('getTodos selector', t => {
  const todos = [
    { id: 0, completed: false, text: 'buy milk' },
    { id: 1, completed: false, text: 'walk the dog' },
    { id: 2, completed: false, text: 'study' }
  ];
  t.deepEqual(getTodos({ todos }), todos);
});
Here, we’re testing if the selector successfully retrieves todos under the key todos from our store. Run npm test to see if this test passes.
Configure the Store
Finally, let’s configure the Redux store using our root reducer. We’re also going to add redux-logger as middleware in the development mode to help with debugging. This will log dispatched actions and store changes to the console of our browser’s developer tools:
// src/configureStore.js
import { createStore, applyMiddleware } from 'redux';
import rootReducer from './reducers';
import createLogger from 'redux-logger';

export default function configureStore(initialState) {
  const middleware = [
    // add common middleware
  ].concat(process.env.NODE_ENV === 'development' ? [
    // add development middleware
    createLogger()
  ] : []);

  const store = createStore(
    rootReducer,
    initialState,
    applyMiddleware(...middleware)
  );

  return store
}
NODE_ENV is an environment variable built into create-react-app, and we can use it to alter behavior of our application as needed. In this case, we are logging Redux only in development.
Now, let’s see if we configured our store correctly by dispatching an action in src/index.js:
// src/index.js
import React from 'react';
import ReactDOM from 'react-dom';
import App from './App';
import './index.css';

import configureStore from './configureStore';
import { toggleTodo } from './actions';

const store = configureStore({
  todos: [
    { id: 0, completed: false, text: 'buy milk' },
    { id: 1, completed: false, text: 'walk the dog' },
    { id: 2, completed: false, text: 'study' }
  ]
});

store.dispatch(toggleTodo(1));

ReactDOM.render(
  <App />,
  document.getElementById('root')
);
Start your application by running:
npm start
We should see the following in the console:
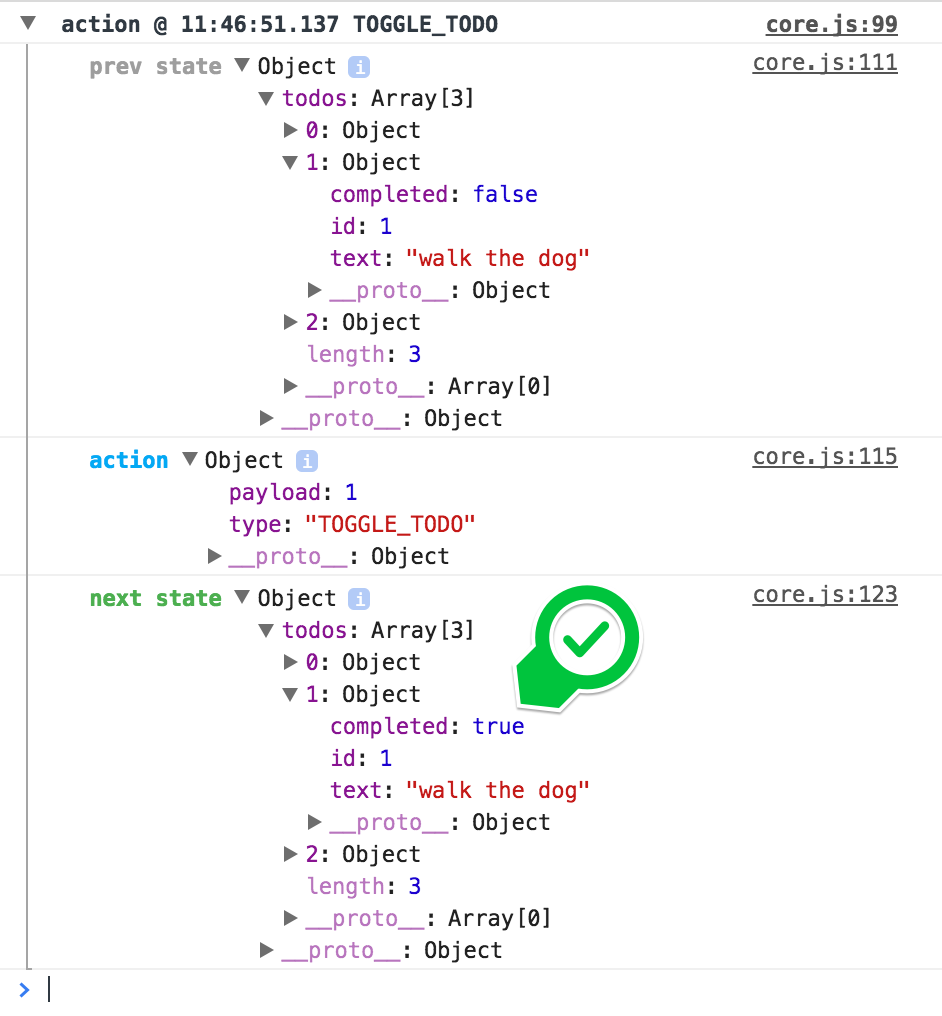
Dispatching the toggleTodo action successfully completed a todo!
Conclusion
In this tutorial, we learned how to test Redux actions, reducers, and selectors. We now have everything we need to test synchronous Redux code. You can apply this knowledge to testing asynchronous code (a.k.a. “side-effects”) as well. For example, dispatching an action could cause an API call, a confirm dialogue, or even dispatching another action.
In the next and final tutorial we will create React components, connect them to the Redux store, and build a simple user interface for our todo application.
If you have any questions or comments about this tutorial, feel free to leave them in the section below.
